How to Create an Email Forwarder: A Step-by-Step Guide
Email forwarders are essential tools for managing communications efficiently. They allow you to automatically redirect incoming emails from one address to another, simplifying how you handle messages across different accounts or domains. Whether you’re looking to consolidate your email addresses or need a way to manage support requests, creating an email forwarder can streamline your email management. Here’s a step-by-step guide to setting up an email forwarder.
Why Use an Email Forwarder?
Before diving into the creation process, let’s understand why email forwarders are beneficial:
- Centralized Management: Redirect emails from multiple addresses to a single inbox, making it easier to manage communications.
- Professional Appearance: Forward emails from a custom domain (like support@yourcompany.com) to your personal or business email.
- Organization: Filter and organize emails automatically based on their origin, improving productivity.
How to Create an Email Forwarder
The process of creating an email forwarder varies depending on the email service provider or control panel you use. Below, we’ll cover how to create an email forwarder using popular platforms: cPanel, Webmail, and Google Workspace.
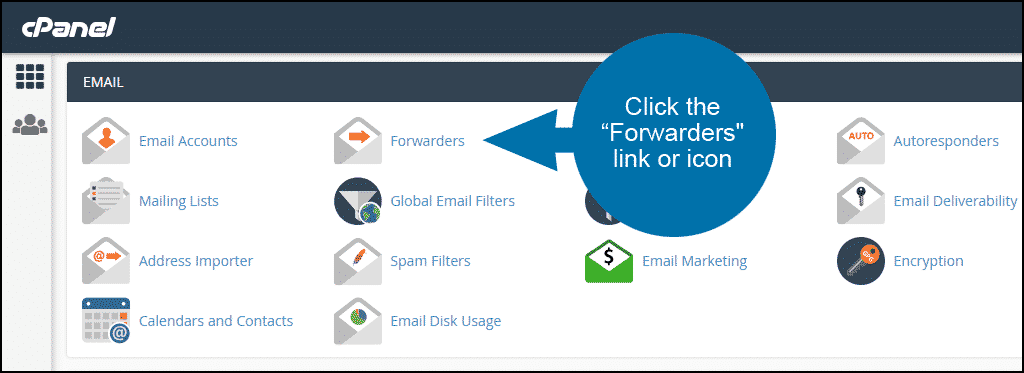
1. Creating an Email Forwarder in cPanel
cPanel is a popular web hosting control panel that many hosting providers use. Here’s how to create an email forwarder in cPanel:
- Log into cPanel: Access your hosting account and navigate to the cPanel dashboard.
- Find the Forwarders Section: Look for the “Email” section and click on “Forwarders.”
- Add a New Forwarder: Click the “Add Forwarder” button.
- Enter Forwarding Details:
- Address to Forward: Enter the email address you want to forward (e.g., info@yourdomain.com).
- Destination: Enter the email address where you want the emails to be forwarded (e.g., your personal email).
- Click “Add Forwarder”: Save the settings. Your email forwarder is now set up.
2. Creating an Email Forwarder in Webmail

If you use Webmail (like Roundcube or SquirrelMail), you can set up email forwarding directly from the webmail interface:
- Log into Webmail: Access your Webmail account.
- Navigate to Settings: Look for the “Settings” or “Preferences” option, usually found in the top menu or sidebar.
- Find Forwarding Options: Look for “Filters” or “Forwarding” settings.
- Create a New Forwarding Rule:
- Email Address: Enter the address you want to forward.
- Forward To: Specify the destination email address.
- Save Changes: Apply the settings. Your forwarding rule will now be active.
3. Creating an Email Forwarder in Google Workspace (Gmail)
For Google Workspace (formerly G Suite) users, setting up email forwarding is straightforward:
- Log into Gmail: Access your Gmail account.
- Go to Settings: Click the gear icon in the top right corner and select “See all settings.”
- Navigate to Forwarding and POP/IMAP: Go to the “Forwarding and POP/IMAP” tab.
- Add a Forwarding Address:
- Forwarding Address: Click “Add a forwarding address” and enter the email address you want to forward emails to.
- Verify Forwarding Address: Google will send a verification email to the forwarding address. Click the verification link in the email.
- Set Up Forwarding: Return to the Gmail settings, select “Forward a copy of incoming mail to,” and choose the forwarding address from the dropdown menu.
- Save Changes: Click “Save Changes” to activate the forwarding rule.
Managing and Testing Your Forwarder
Once you’ve set up your email forwarder, it’s essential to manage and test it to ensure it’s working correctly:
- Test the Forwarder: Send a test email to the address you’ve set up forwarding for and verify that it arrives at the destination email.
- Manage Forwarders: Regularly check and update your forwarding rules as needed. For example, you might need to change the destination address if your email address changes.
Troubleshooting Common Issues
If your email forwarder isn’t working as expected, consider these troubleshooting tips:
- Check Spam Filters: Ensure that forwarded emails aren’t being caught in spam or junk folders.
- Verify Forwarding Rules: Double-check that the forwarding rules are correctly set up and not conflicting with other email settings.
- Review DNS Settings: Ensure your domain’s DNS settings are correctly configured, particularly if you’re using custom domains.
How to Create an Email Forwarder