How to Install an SSL Certificate for Your Domain in IIS
Install an SSL Certificate for Your Domain in IIS – Securing your website with an SSL certificate is essential for protecting sensitive data and improving SEO. This guide will walk you through the steps to install an SSL certificate for your domain using Internet Information Services (IIS).
Prerequisites
- IIS Installed: Ensure you have IIS installed on your Windows Server.
- SSL Certificate: Obtain an SSL certificate from a Certificate Authority (CA) or create a self-signed certificate for testing purposes.
Step 1: Obtain an SSL Certificate
If you haven’t already, you can purchase an SSL certificate from a CA or generate a self-signed certificate.
To create a self-signed certificate:
- Open IIS Manager.
- In the Connections panel, select the server node.
- In the right pane, double-click on Server Certificates.

Install an SSL Certificate for Your Domain in IIS - Click on Create Self-Signed Certificate in the Actions pane.
- Enter a friendly name for the certificate and click OK.
Step 2: Bind the SSL Certificate to Your Domain
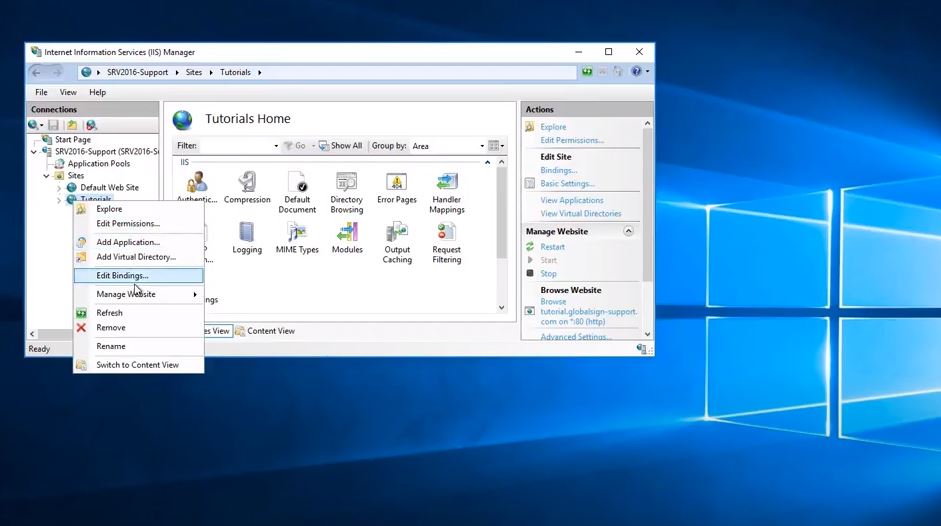
- Open IIS Manager.
- In the Connections panel, expand the node for your server and select the site you want to secure.
- In the right pane, click on Bindings.
- In the Site Bindings window, click Add.
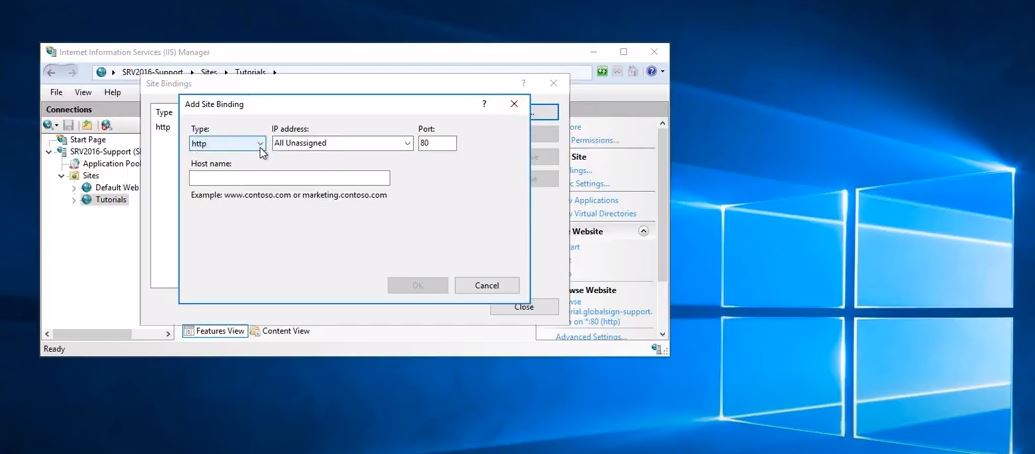
Install an SSL Certificate for Your Domain in IIS - In the Add Site Binding window:
- Type: Select
https. - IP address: Choose
All Unassignedor specify an IP address. - Port: Leave it as
443. - SSL Certificate: From the dropdown, select the SSL certificate you want to use.
- Type: Select
- Click OK and then Close the Site Bindings window.
Step 3: Configure SSL Settings
- With your site still selected in IIS Manager, double-click on the SSL Settings feature in the middle pane.
- Check the box for Require SSL if you want to enforce HTTPS connections.
- Optionally, you can select Require SSL and specify the client certificates required if applicable.
- Click Apply in the Actions pane to save the changes.
Step 4: Test Your SSL Installation
- Open a web browser and navigate to your domain using
https://(e.g.,https://yourdomain.com). - Verify that there are no warnings about the security certificate.
- Use online tools like SSL Labs’ SSL Test to check the installation and configuration.
Step 5: Redirect HTTP to HTTPS (Optional)
To ensure all traffic uses HTTPS, you can set up a redirect:
- In IIS Manager, select your site.
- Double-click on the URL Rewrite feature. (If it’s not installed, you can add it through the Web Platform Installer.)
- Click on Add Rule(s) and select Blank rule.
- Configure the rule as follows:
- Name: Redirect HTTP to HTTPS
- Match URL:
- Requested URL: Matches the pattern
- Using: Regular expressions
- Pattern:
.*
- Conditions: Add a new condition:
- Condition input:
{HTTPS} - Check if input string: Matches the pattern
- Pattern:
^OFF$
- Condition input:
- Action:
- Action type: Redirect
- Redirect URL:
https://{HTTP_HOST}/{R:0} - Redirect type: Permanent (301)
- Click Apply to save the rule.
Conclusion
Congratulations! You have successfully installed and configured an SSL certificate for your domain in IIS. By securing your website with SSL, you not only protect your users’ data but also enhance your site’s credibility and search engine ranking. If you encounter any issues, consult the IIS documentation or reach out to your SSL provider for support.